Installation of Shopializable on Magento.
If you have not already the module, you can order it on our shop.
Facebook application installation on a Magento system
Upload all the folders (app, skin..) from the archive you got in you Magento directory.
After, connect yourself on your Magento control panel, and flush the cache by clicking on System > Cache Management > Flush the cache.

Refresh your account permissions. You can disconnect yourself and reconnect from the admin panel.
Go to the configuration panel of our extension Shopializable : System > Configuration. On the left side, below Shopializable, click on « Configuration ».
Fill the configuration form :
- About the template name, enter the one you will use. (default-reduced french, default-reduced-en english, default-reduced-es spanish, default-reduced-it italian, default-reduced-de german).
- Le nombre de produits affiché par page (9 est un bon chiffre).

Then, click on « save configuration ».
The last thing is to flush the extension cache, by clicking on the Shopializable menu > Cache.

Let’s have a look to Facebook now.
Installation of Shopializable on Facebook for a Magento system
Please follow the instructions once you are logged on Facebook and you’ve created your Facebook page. The application must settle on a Facebook page (page Fan page Business, more …) and not an account / Facebook profile. If you do not have a page, you can create one at this address : https://www.facebook.com/pages/create.php
Sign into your Facebook account, then click on the following link : https://www.facebook.com/dialog/pagetab?app_id=290911957094&redirect_uri=https://apps.facebook.com/shopializabled/
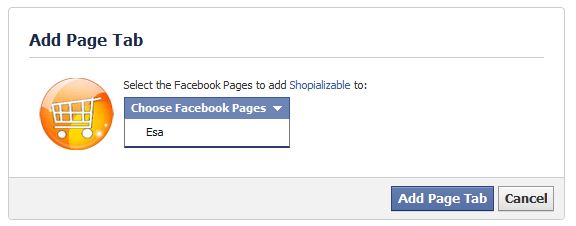
A Facebook popup should appear with a drop down menu containing your Facebook page. Choose the page where you want to install the module, then click on « Add to my page ».
(To add an application on a Facebook page, you need to have a Facebook account with administrators rights on the Facebook page. If you don’t see the link « Add to my page », then you need to create Facebook profile and to add it as administrator of your Facebook page. Otherwise, you can contact us, we will do it for you).

Once installed, you should see a blank page. Go to your Facebook page (by searching the name of your page).
Click on the link « edit my page » in the upper right.

You will now have the configuration page. On the left side, click on « Applications ».

In the applications list, let’s find the item « Shopializable2 », then click on go to the application (the left link).

Here’s the configuration page of our module. In the first field, enter the exact url to our extension : your shop url following by « /shopializable/ ».
For exemple : https://www.myshop.com/shopializable/
Do not forget the « https:// » and the last slash « / » .
Ensure you check the checkbox and validate the form.

After it done, go back to your Facebook page. You are supposed to see a Shop tab. If not click on the next « plus » button on your right.

If you see a link « Shop » click on it, the module should be showed. You can move the tab on the left in order to make it more attractive.
If you have not seen the link, enter « Shop » in the search field, you will see the name of our application « Shopializable2 ».

The installation process is over.
You can modify all the template, css, html, images, translate or change the words by modifying the files inside the template folder you choose. The templates folders are located at « /skin/shopializable/template/ ».
Also, we are developping premium templates . Contact us for detailed informations !
No support by using comments. Please use the contact form instead, we will answer you as soon as possible. Please add to your application the url of your shop, and the url of your Facebook page.


